
You are here: Start » Getting Started » Main Window Overview
Main Window Overview
Elements of the User Interface
The user interface of FabImage Studio has been carefully designed for optimal user experience. All the main elements of the application are available on a single screen, as depicted below. The standard layout of windows can be changed in an arbitrary way – use this feature to adapt the application to your preferences. In particular, it is advisable to work with two HD monitors (or one curved ultra-wide, 34'') and use the second monitor to display undocked data previews or the HMI window.
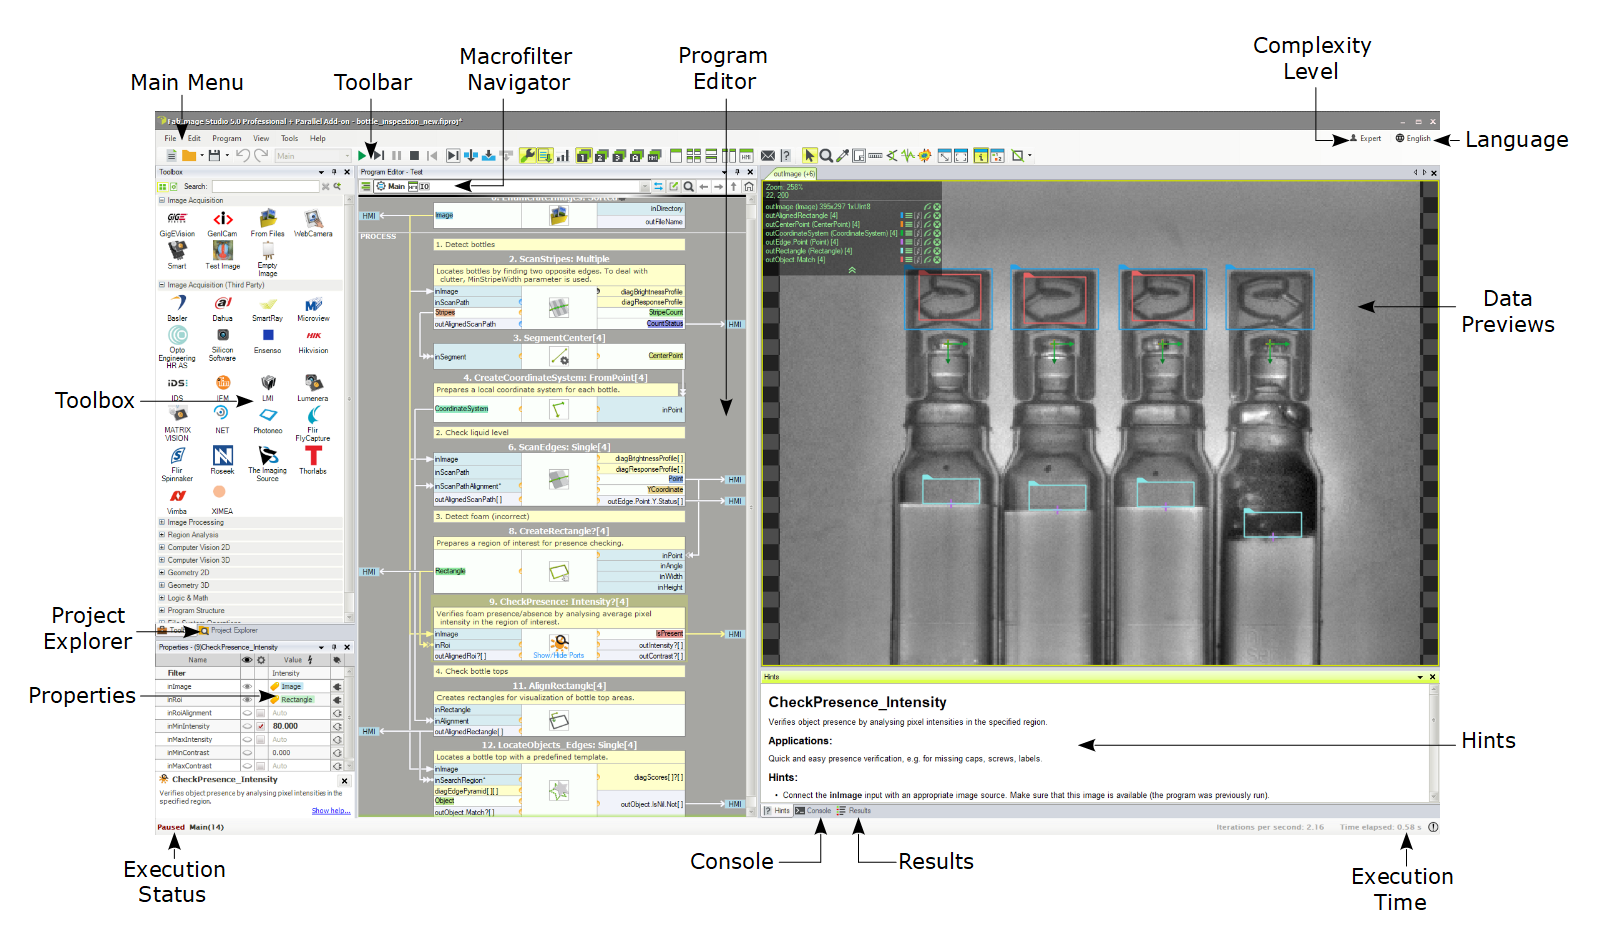
Elements of the User Interface.
The purpose of the individual controls, going clockwise starting from the top left corner, is as follows:
- Main Menu and Toolbar
This is a standard application menu that contains all major actions and options, as well as a control bar which provides convenient access to the most common actions.
See also: Main Menu and Application Toolbar
- Macrofilter Navigator
This control displays the tree of the macrofilter instances contained within the selected program. By default it is attached to the top of Program Editor, but can also be undocked and placed anywhere in the main window. - Program Editor
The Program Editor is the area within FabImage Studio in which filters (tools) are placed and connected to create programs. To insert a filter there, just drag and drop one from the Toolbox or double-click on it.
See also: Program Editor
- Complexity Level
This option controls the amount of features that are available according to the user's personal experience and needs.
See also: Complexity Levels
- Language
This option controls the language of the user interface (English, German, Japanese, Polish, Simplified Chinese and Traditional Chinese). - Data Previews
These panels display the data computed by filters. If you drag and drop inputs and outputs of various filters, this is where you will see the corresponding data. Extra options can be found in the Toolbar.
See also: Preview and Data Presenting
- Hints
This window provides hints as for the use and function of various filters as well as possible solutions to the most common problems. - Execution Time
It displays the total execution time of the ongoing execution process.
See also: Optimizing Image Analysis for Speed
- Results
The Results window has two functions. First, it displays numerical and textual outputs of the selected filter as well as the relevant statistics. Second, it allows for setting limits upon output values, thus providing a quick and easy way for telling OK objects from NOK ones during inspection. - Console
The Console window informs the user about events related to project editing and execution. It is particularly important for finding errors. - Execution Status
It informs the user whether the program is running, paused or stopped. During execution it also displays the current program location (the call-stack). - Properties
The Properties window is where the parameters of filters and HMI controls are set. - Project Explorer
It displays a list of modules, macrofilters, global parameters and attachments contained within the currently edited project. Please note that you only see a list of definitions of macrofilters here, not their instances. One macrofilter (design) can have multiple instances (uses) and individual instances can be browsed in the Macrofilter Navigator control.
See also: Browsing Macrofilters
- Toolbox
It is a task-oriented catalog of filters commonly used in machine vision applications.
See also: Toolbox
Program Display
The Program Editor in FabImage Studio is available with three display modes featuring different level of details. To change the display mode, expand the View bar and select Minimal, Compact or Full; each of them will suit various users to different degrees.
- Minimal
Minimal program view is recommended for small-scale applications, typically ones that fit into one screen. In this mode, connections between filters are hidden and named output labels are used instead. The main benefit here is that basic applications can be easily presented in a single view. On the other hand when the program is getting bigger, dependencies between different program elements may become less clear and the program becomes more difficult to analyze.
In Minimal program view you create connections by naming outputs and selecting them from a drop-down menu in the Properties window. The drag & drop action between filters is also possible, but the connection still remains hidden.
This view is the only one available in the SMART edition.
- Compact
Compact program view is the default one in the Professional edition. It aims to provide the optimal level of detail by displaying explicit connections between filters while still hiding some inputs and outputs that are usually not being connected (you can use the Show/Hide action to change that for any port).
This mode suits well both simple and complex applications alike.
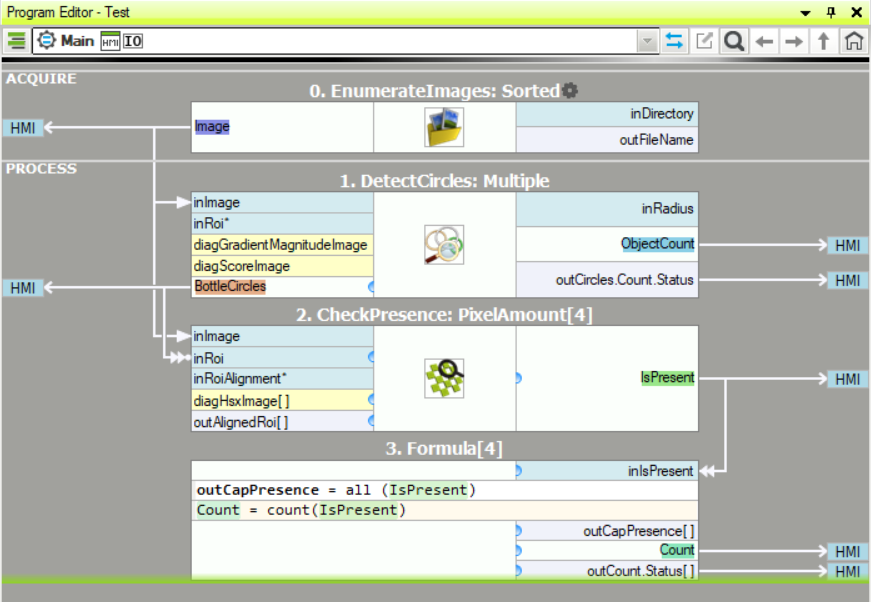
- Full
Unlike in the Compact mode, here all the inputs and outputs of the given filter are always visible. Most importantly, this mode provides a handy preview of the filter's properties directly in the Program Editor – whenever possible they are displayed on the right margin of the editor. This, however, comes at the cost of higher verbosity which may impact readability.
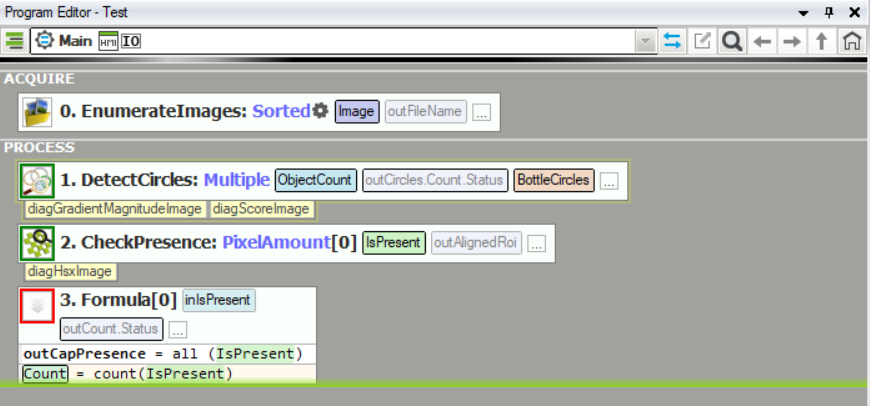
The Minimal view in the Bottle Crate example.
The Compact view in the Bottle Crate example.

The Full view in the Bottle Crate example.
The Basic Workflow
Creating vision algorithms in FabImage Studio comes down to three intuitive steps:
- Drag & drop (or double-click) filters from the Toolbox to the Program Editor.
- Drag & drop connections between filters or set constant input values in the Properties window.
- Drag & drop filter outputs to the Data Previews panels.
Whenever a part of a program is ready, click Run or Iterate buttons in order to test it. The Console window at the bottom will also display some important information concerning the execution. Keep an eye on it – especially when something goes wrong.
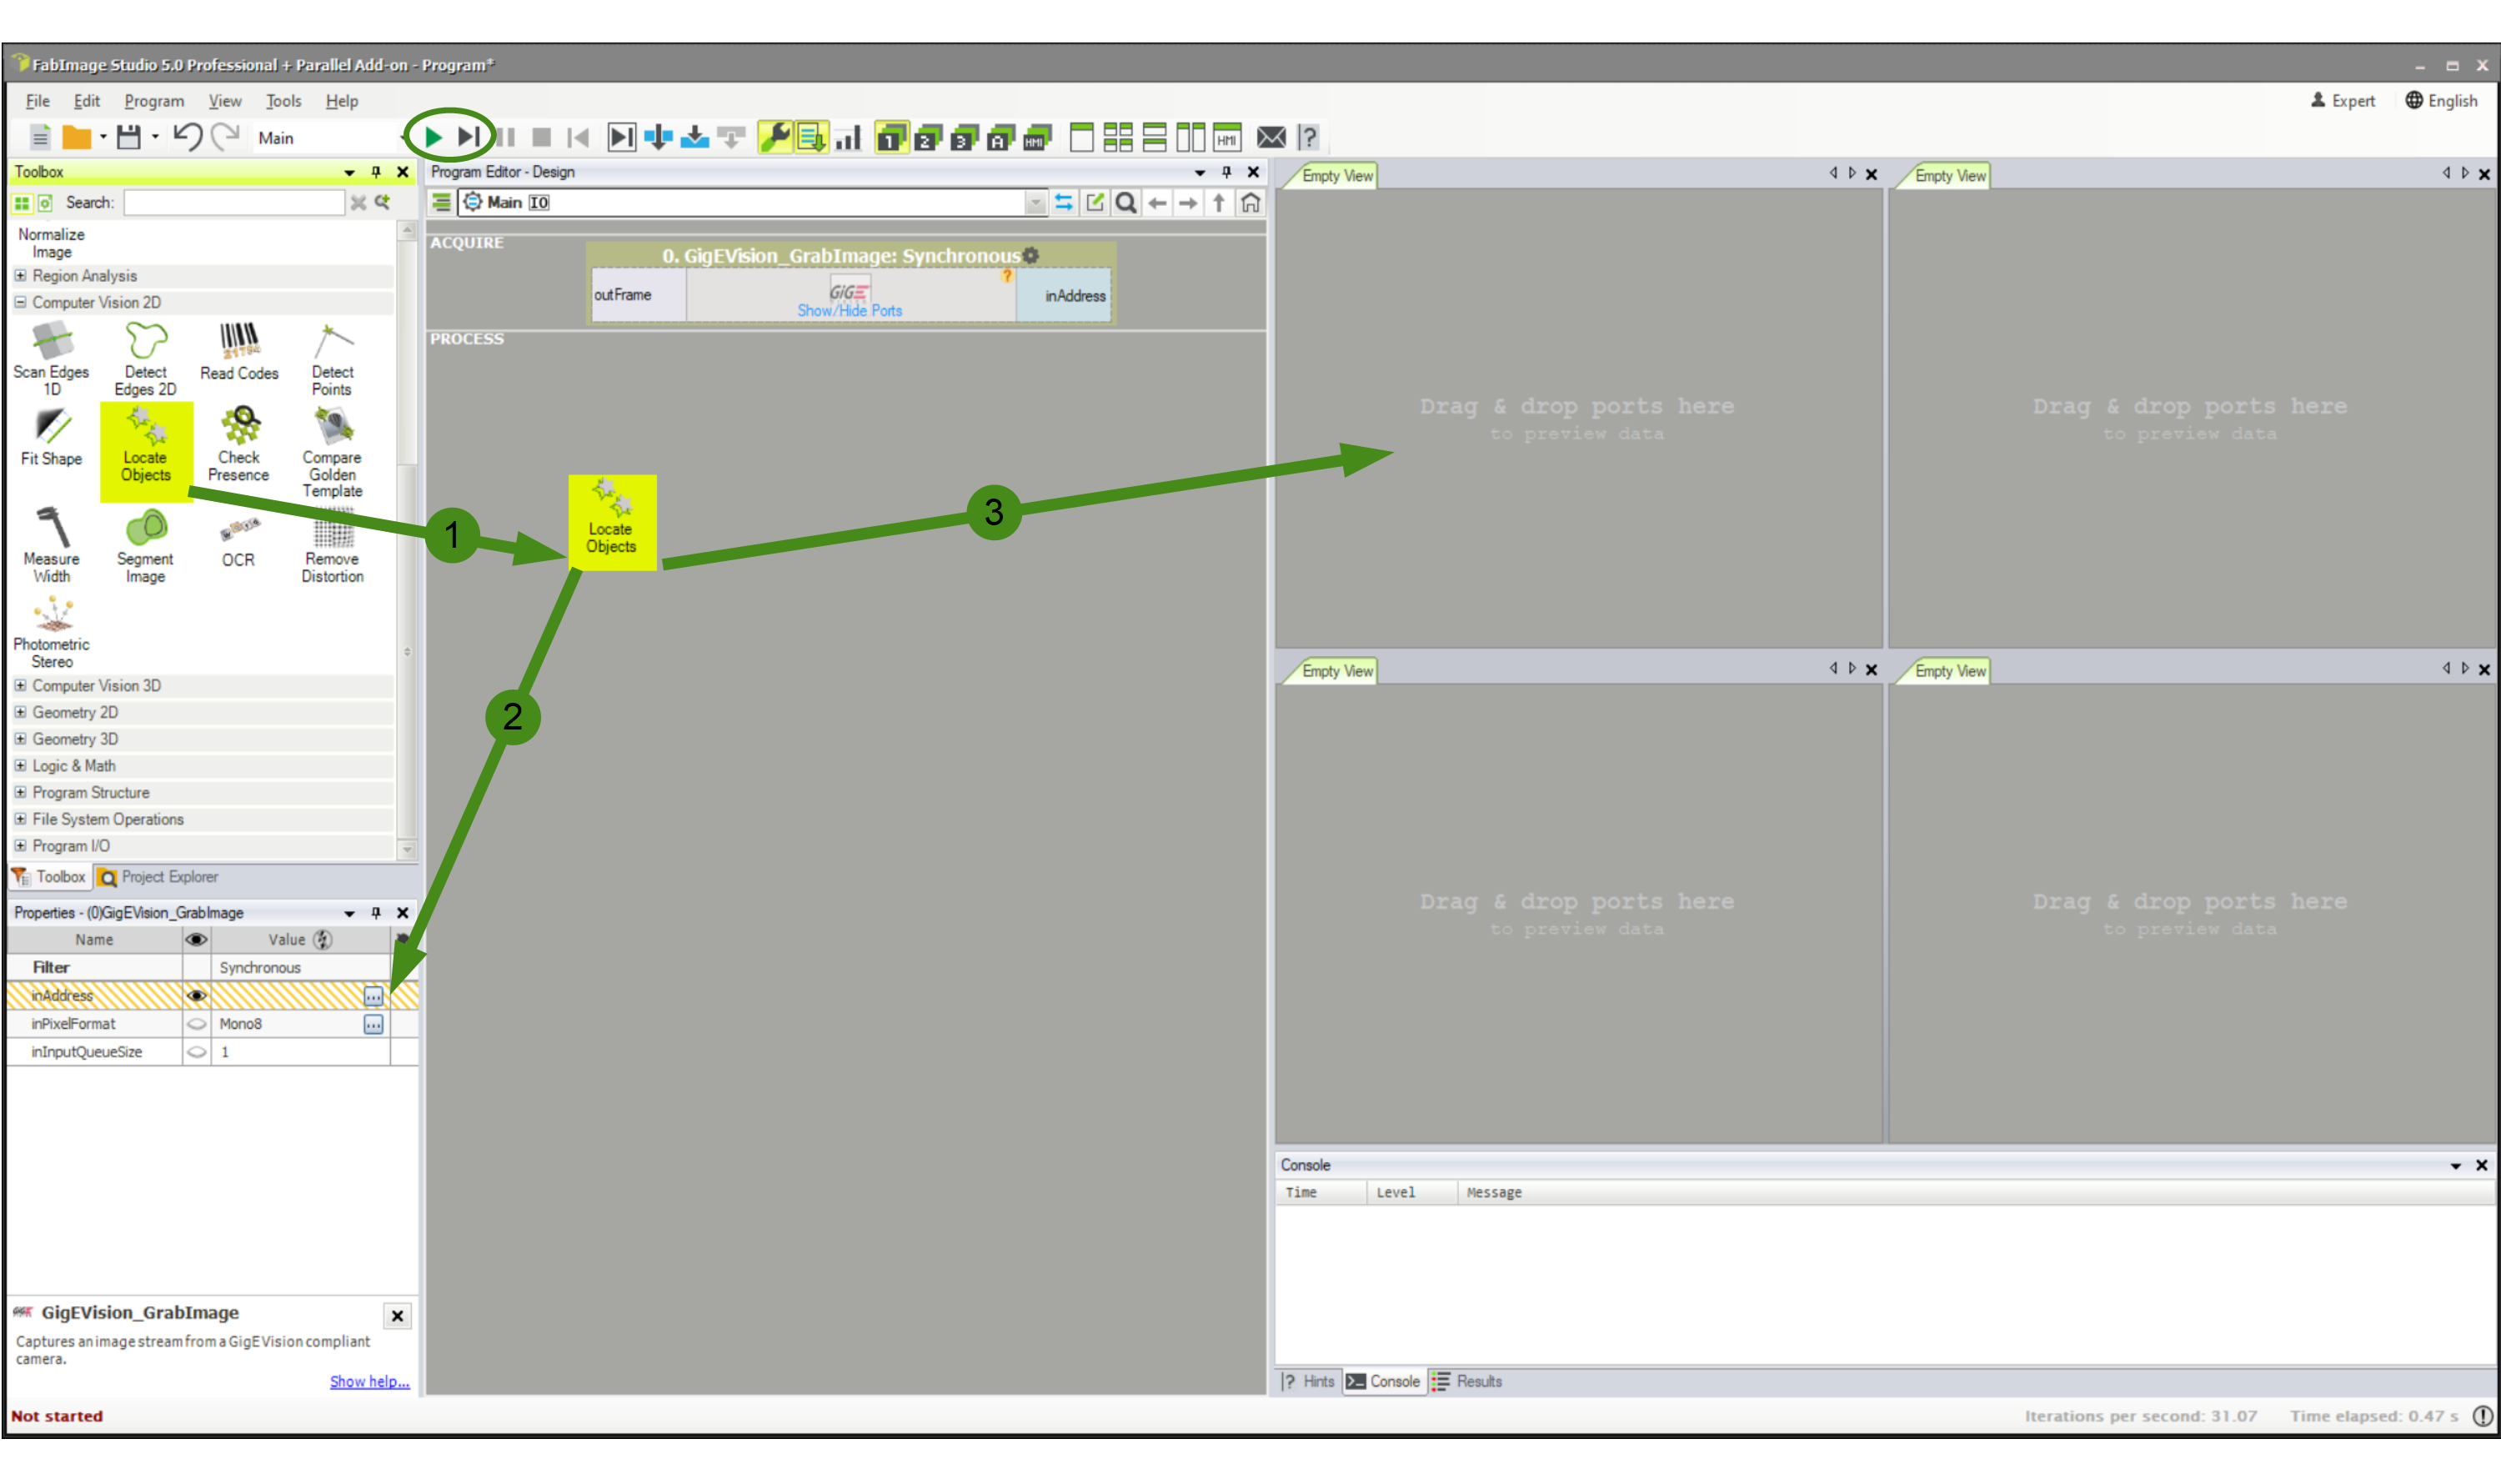
The workflow of FabImage Studio.
| Previous: Installation | Next: Main Menu and Application Toolbar |